Flawless Base Routine: Step-by-Step for Smooth, Radiant Skin
279 views
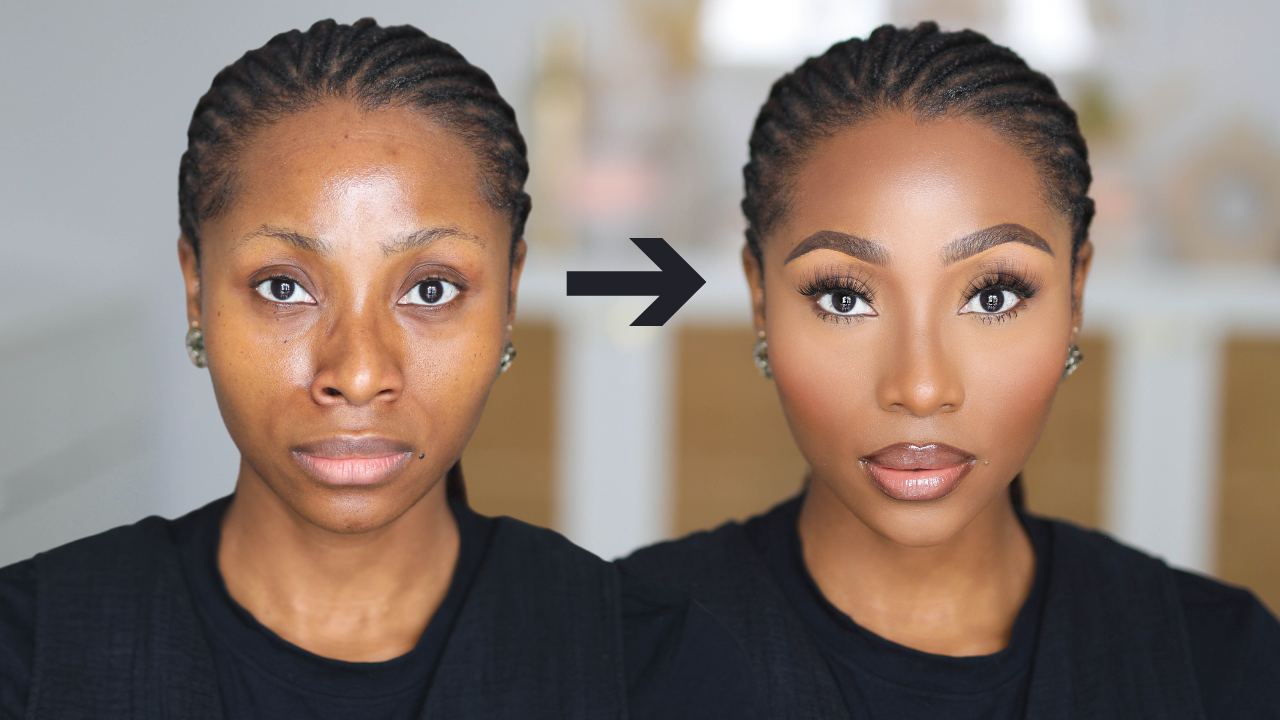
Introduction
A smooth makeup base is no longer about covering imperfections. In 2026, the focus has shifted toward skin-like finishes that balance hydration, texture, and longevity. Trends such as “cloud skin” highlight a soft, blurred look that sits between matte and dewy finishes.
At the same time, base products are evolving into hybrid formulas that combine skincare benefits with makeup performance.
This guide breaks down a practical, step-by-step routine that reflects how people actually achieve a flawless base today—whether you’re a beginner or refining your current process.
What “Flawless Base” Means Today
A flawless base is not about heavy coverage. It usually includes:
- Even skin tone (not fully masked skin)
- Smooth texture under natural light
- Makeup that lasts without patchiness
- A finish that matches your skin type (not trends alone)
Modern base routines rely heavily on preparation. Hydrated skin improves both application and wear time, which is why most current routines prioritize skincare before makeup.
Step-by-Step Flawless Base Routine
Step 1: Cleanse Properly (Morning and Night)
A clean surface improves how makeup sits and lasts.
Practical method:
- Morning: gentle cleanser or rinse
- Night: double cleanse (oil + water-based)
This removes sunscreen, oil, and residue that can cause uneven texture.
Real-world example:
If your foundation separates around the nose after 2–3 hours, leftover oil or incomplete cleansing is often the cause—not the foundation itself.
Step 2: Skin Prep (The Most Overlooked Step)
Skin prep has a direct effect on finish.
Minimum routine before makeup:
- Lightweight hydrating serum
- Moisturizer suited to your skin type
- Sunscreen (daytime)
Hydration improves light reflection and reduces patchiness.
Important detail:
Some modern moisturizers show measurable improvements in skin texture within two weeks when used consistently.
Step 3: Primer (Optional but Strategic)
Primer is no longer mandatory, but it is useful when targeted correctly.
Use primer if:
- You have visible pores → smoothing primer
- Makeup fades quickly → gripping primer
- Skin is dry → hydrating primer
The global primer market continues to grow, reflecting demand for targeted base prep solutions.
Skip primer if:
Your skincare already gives a smooth, balanced surface.
Step 4: Foundation (Choose Based on Skin Needs)
Foundation options are now more diverse than before, including:
- Skin tints (light coverage)
- Serum foundations (hydrating)
- Soft-matte formulas (balanced finish)
Recent trends show a shift toward hybrid finishes that combine blur with hydration instead of extreme matte or shine.
How to apply:
- Use a damp sponge for natural finish
- Use a brush for more coverage
- Apply in thin layers
Key tip:
Start at the center of the face and blend outward. Most redness and uneven tone appear centrally.
Step 5: Concealer (Targeted Use Only)
Avoid applying concealer everywhere.
Where to apply:
- Under eyes (thin layer)
- Around nose
- On specific blemishes
Technique:
- Let concealer sit for 20–30 seconds before blending for better coverage
- Use tapping motions, not dragging
Step 6: Setting (Powder and Spray Balance)
Setting helps control movement and shine.
Use powder for:
- Oily areas (T-zone)
- Under eyes
Use setting spray for:
- Overall longevity
- Natural finish
Modern setting products focus on maintaining hydration while improving wear time, rather than drying out the skin.
How to Adjust the Routine for Your Skin Type
Oily Skin
- Use lightweight moisturizer (don’t skip)
- Choose soft-matte or oil-controlling foundation
- Powder only where needed
Common mistake: Over-powdering, which can trigger more oil production.
Dry Skin
- Focus on layered hydration
- Avoid heavy matte formulas
- Use minimal powder
Tip: Mix a small amount of moisturizer into foundation for smoother application.
Combination Skin
- Use different techniques on different areas
- Hydrate cheeks, control oil in T-zone
Example:
Apply powder only on forehead and nose, leaving cheeks untouched for a natural finish.
Non-Obvious Mistakes That Ruin Your Base
1. Using Too Much Product
Heavy layers create texture instead of hiding it.
Fix: Use thin, buildable layers.
2. Skipping Waiting Time Between Steps
Products need time to settle.
Ideal timing:
- Skincare → wait 1–2 minutes
- Primer → wait 30–60 seconds
3. Mismatched Formula Combinations
Oil-based foundation + water-based primer can cause separation.
Solution: Match base types when possible.
4. Ignoring Climate
Humidity affects wear.
Example:
In humid areas, lighter layers and setting spray work better than heavy powder.
Cost Breakdown: Realistic Budget for a Base Routine
A functional routine does not require luxury products.
Typical price ranges:
- Cleanser: $8–$25
- Moisturizer: $10–$40
- Primer: $10–$35
- Foundation: $10–$60
- Concealer: $6–$35
- Powder/Spray: $8–$40
Estimated total: $50–$150 for a complete routine
Insight:
Affordable products often perform similarly to premium ones when technique and skin prep are correct.
How Long It Takes to See Improvement
A flawless base improves over time with consistent habits.
- Immediate: smoother application with better prep
- 2–3 weeks: improved skin texture
- 6 weeks: noticeable improvement in overall finish
Some foundation formulas with skincare ingredients show visible skin clarity improvements over several weeks of use.
Real-World Routine Example (Beginner-Friendly)
Morning (10–12 minutes):
- Cleanse (30 seconds)
- Moisturizer + sunscreen (1–2 minutes)
- Primer (optional)
- Foundation (2 minutes)
- Concealer (1 minute)
- Powder + spray (1–2 minutes)
Result:
Natural, even skin that lasts 6–8 hours without touch-ups.
Advanced Tips for a More Natural Finish
- Use a damp sponge to remove excess product after blending
- Apply foundation only where needed, not full face
- Press (don’t swipe) products into the skin
- Use less powder than you think
- Blend under natural light, not just indoor lighting
FAQ
How do I stop foundation from looking cakey?
Use less product, hydrate properly, and blend with a damp sponge. Cakey texture usually comes from layering too much.
Is primer necessary for a flawless base?
Not always. It helps in specific cases like large pores or oily skin but can be skipped if skincare is sufficient.
Which foundation finish is best in 2026?
Soft, blurred finishes are currently preferred. They combine light reflection with controlled shine.
How often should I change my base routine?
Adjust based on seasons or skin changes. For example, lighter formulas in humid weather and more hydration in dry conditions.
Conclusion
A flawless base is built through preparation, technique, and consistency rather than expensive products. Current trends emphasize balance—hydrated but not greasy, smooth but not heavy.
When you focus on skin prep, apply products in thin layers, and adjust based on your skin type, achieving a smooth and radiant finish becomes more predictable and repeatable.
The most effective routine is not the most complex one. It is the one you can follow consistently and adapt as your skin changes.
flawless base routine
smooth radiant skin
makeup base tips
glowing skin routine
flawless makeup look
skin prep guide
even skin texture
radiant complexion
beauty routine
base makeup steps
Found this helpful? Share it!